MuMu Player 12 macro key mapping function is now available! Now MuMu brings you the following tutorial to help you get started quickly~
Note: If the version you are using does not have the macro key mapping function, please upgrade to the latest version>>Click to get the latest version.
【Table of contents】
(1) How to create and edit macro key
(2) Macro key command instructions
1. Trigger time control command
2. Single click command
3. Hold and release command
4. Slide command
5. Waiting command
6. Crosshair commands (hide and show cursor commands)
7. Loop command
8. Other commands
9. Global variables
(1) How to create and edit macro keys
Step 1: Click the keyboard&mouse icon in the upper right corner of the emulator. After entering the key mapping interface, right-click the mouse to expand the key panel to add macro keys;
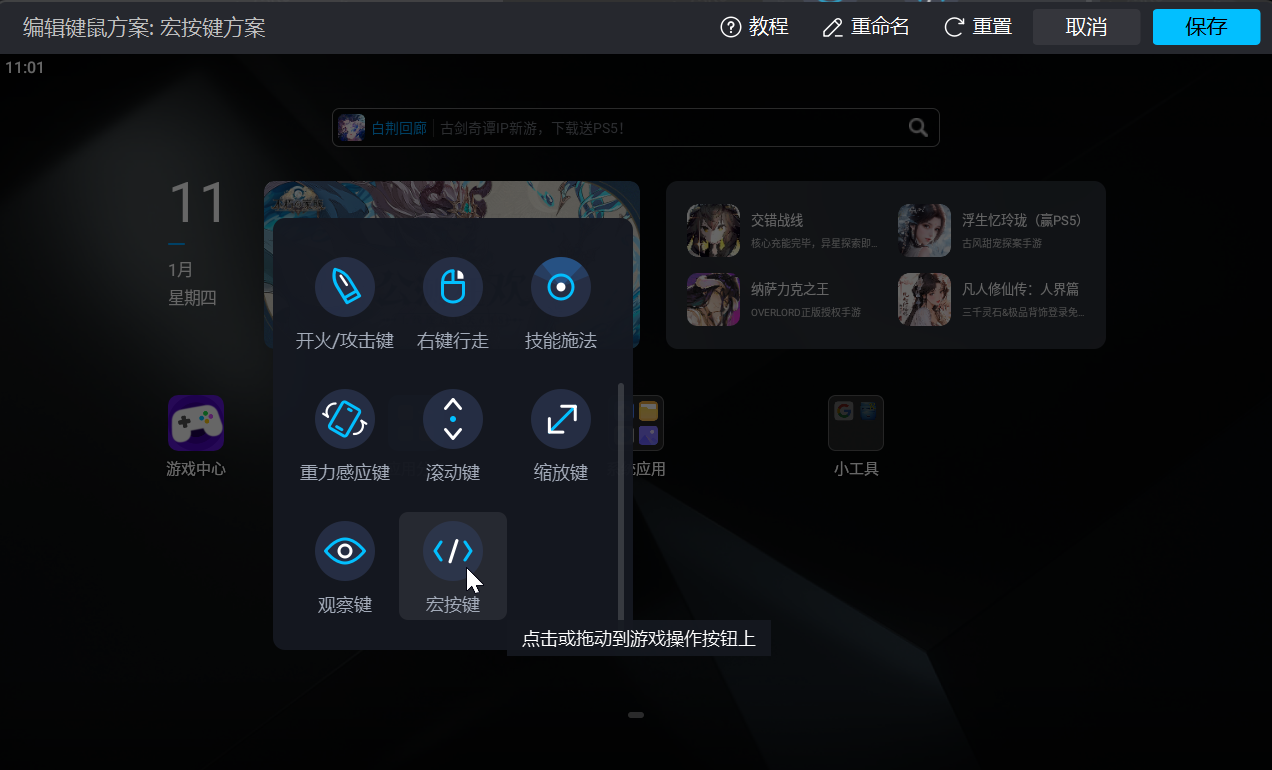
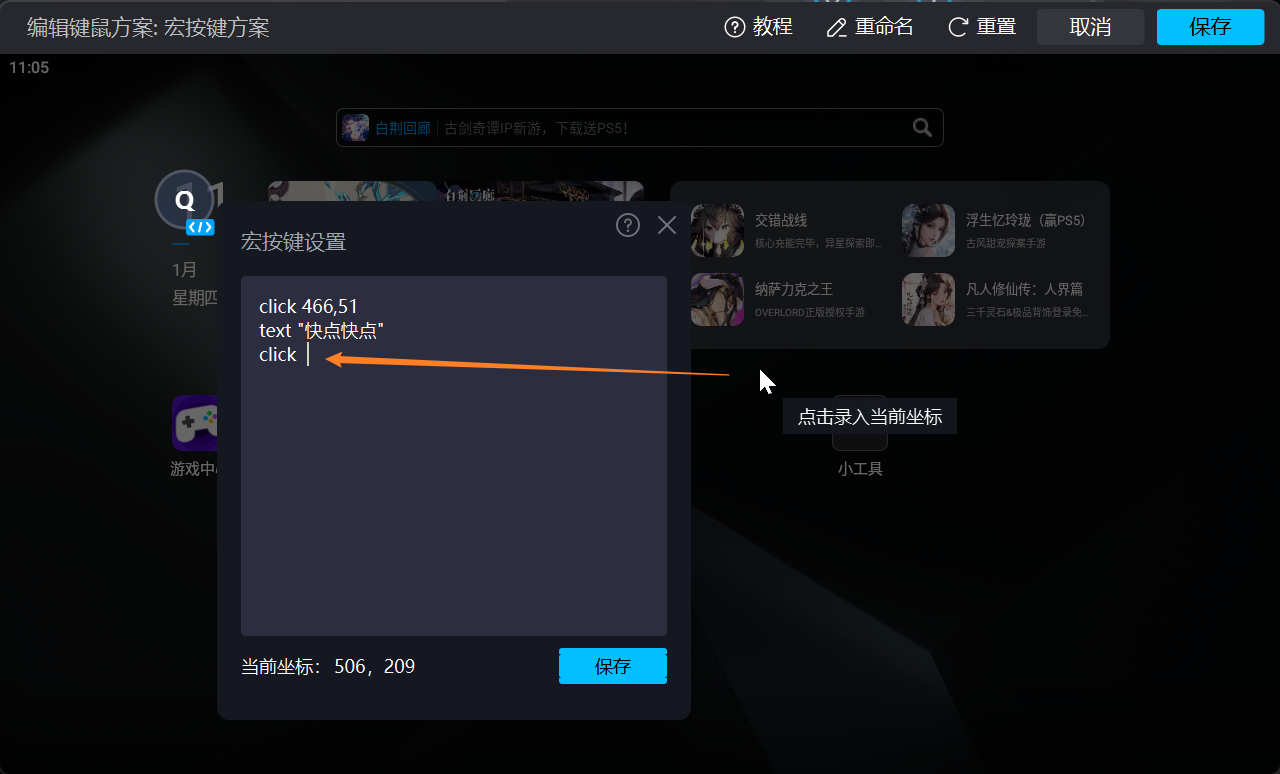
Step 2: After adding a macro key, click the lower right corner of its icon to enter the macro key editing interface.
Note: When editing macro keys, you need to pay attention to the following points
1. The use of common shortcut keys for editing operations is supported, such as Ctrl+A to select all, Ctrl+V to paste, Ctrl+X to cut, Ctrl+Z to undo, Ctrl+Y to redo, etc.;
2. All instructions must be in English lowercase;
3. When you click on the interface, the coordinates of the location will be automatically obtained;
4. Pay attention to the [Save] macro button to avoid accidentally closing the editing pop-up window and causing the content to be lost.
(2) Macro key command instructions
[Trigger time command]
release_actions: Each key operation has a pressed ↓ and released ↑ state. The holding state can be completed by these two combinations with instructions.
When the macro key is executed, the default is to trigger immediately when the key is pressed;
If some commands need to be triggered when released, enter the release_actions command before the command that needs to be released.
Example:
//When pressing the macro key, press and hold the coordinate point (0,0). When releasing the macro button, release the coordinate point (0,0).
Press 0,0
release_actions
Release 0,0
[Single click command]
click x1,y1 x2,y2...: Click on a coordinate point to support clicking on one location, or click on multiple locations at the same time to achieve multi-touch.
Support coordinate point variables, such as mouse.
Note: For single click command, the time from pressing a certain coordinate to releasing is fixed.
Example:
//Click the coordinate point (0,0)(1,1) and the current mouse position at the same time, wait for 100 milliseconds, and click again (2,2)
Click 0,0 1,1 mouse
sleep 100
Click 2,2
[Hold and release command]
press x1,y1 x2,y2...: Press and hold a coordinate point, support pressing and holding one position, or pressing and holding multiple positions at the same time.
release x1,y1 x2,y2...: Release the holding state of a coordinate point, and support releasing one or more positions.
switch x1,y1 x2,y2...: Switch the [Hold] and [Release] states of a certain coordinate point.
The above three instructions support coordinate point variables, such as mouse.
Example:
//Press and hold (0,0) and (1,1) at the same time, then release when the macro button is released
press 0,0 1,1
release_actions
release 0,0 1,1
//Switch (0,0) touch state, switch state every time the macro button is pressed
switch 0,0
key_press a: Simulate pressing a keyboard key.
key_release a: Simulates releasing a keyboard key.
key_switch a: Switch the pressed/released state of a keyboard key.
Example:
//When pressing and holding the macro button, it simulates pressing [A] at the same time. When releasing the macro button, release [A].
key_press a
release_actions
key_release a
//The [A] key is a combo key. Each time the macro button is clicked, the state of the [A] key is switched.
//Realize the simulation of holding down the [A] key to continue a combo, and pressing it again will end the combo.
key_switch a
mouse_press left: Mouse-specific, simulates pressing a mouse button.
mouse_release left: Mouse-specific, simulates pressing and releasing the mouse button.
mouse_switch left: Mouse-specific, switches the hold/release state of a mouse button.
The above three commands are supported: middle button, left button, right button, back button, and forward button.
joystick_press a: dedicated to the controller, simulating pressing a certain controller button.
joystick_release a: dedicated to the handle, simulating pressing and releasing the handle button.
joystick_switch a: dedicated to the controller, switching the hold/release state of a certain controller button.
The above commands support all controller keys, such as a, b, x, y, lb... in xbox controller/mode; ps controller, 0, 1, 2
Note: different brands and models of controllers have different key values, so you can fill in the parameters according to the key value name displayed by the button to be called. For the key value name, you can first add a click button, enter the key value and see what the key value is.
[Slide command]
curve x1,y1 x2,y2...: means sliding from (x1,y1) to (x2,y2), and then to...
Note: It needs to contain at least 2 positions, and the time between each sliding point is fixed; supports global variables, such as mouse.
The sliding auxiliary command is added before the sliding command to help achieve other operation effects:
curve_first_time time (ms): Indicates that you need to stay at the first point. The command needs to be followed by a time parameter, the unit is ms.
curve_last_time time (ms): Indicates that the sliding is completed and stays at the last point. The instruction needs to be followed by a time parameter, the unit is ms.
curve_last_time untilcmd: means staying at the last point and waiting for the release command curve_release.
curve_release: Indicates releasing the touch of the curve and releasing the command. This command is written after the sliding command.
Example:
//Sliding starts from (0,0), stays at (0,0) for 100ms, slides to (1,1), then slides to the current mouse position, and ends the slide after releasing the macro button
curve_first_time 100
curve_last_time untilcmd
curve 0,0 1,1 mouse
release_actions
curve_release
[Waiting command]
sleep duration: means waiting for a certain period of time before continuing execution.
Example:
//After clicking (0,0), wait for 1 second and click another position (1,1)
click 0,0
sleep 1000
click 1,1
[Crosshair commands (hide and show cursor commands)]
enter_staring: Entering the crosshair
exit_staring: Exit the crosshair
[Loop command]
…….
loop_end
Indicates the beginning of the loop. The instructions from loop to loop_end are instructions that need to be run in a loop.
loop has a loop count parameter:
Use numbers directly to express the number of times, such as: loop 100
If you need to loop until the macro button is released, use: loop until_release
Note:
① Currently, the loop does not support execution when part is pressed and execution when part is released, that is, when release_actions is inserted in the middle of the loop, the loop command will be invalid;
② When setting up a loop, if the time in the loop is long, it is not recommended to use the release_actions instruction before executing other instructions. The released instruction may not run properly because the loop has not ended;
③The loop_end instruction must be included after the loop.
Example:
//Set when pressing and holding the macro key, continuously click the mouse position, hold it for 50 milliseconds each time and then release it. Stop clicking until the macro button is released.
loop until_release
press mouse
sleep 50
release mouse
sleep 50
loop_end
[Other commands]
text "xxxx": Enter the text xxxx.
Note:
① The text content needs to be enclosed in English double quotes.
② Macro keys containing text commands cannot be used when the input box is open, because when the input box is open, the key mapping is invalid, resulting in the inability to use the macro keys normally, so please add an open input box when configuring text input operation.
Example:
//Click the (0,0) position, wait 1 second for the input box to expand normally, enter the text, wait 100 milliseconds for the text to be input normally, and then click the position (1,1) to close the input box
click 0,0
sleep 1000
text "123456"
sleep 100
click 1,1
In this example, sleep is added to prevent click and text input from being executed at the same time. If sleep is not added, when click and text input are executed at the same time, the text input operation has been completed before the input box is opened.
release_all: Indicates releasing all pressed keys
[Global variables]
mouse: indicates the coordinate point where the current mouse cursor is located